What is exposure compensation and how do you use it for better pictures?
If you’re shooting a camera, these days it is highly likely you are shooting on the camera’s auto mode but are also wanting to shoot on manual. What’s holding you back? Two things typically keep photographers from shooting on manual:
1) Taking the time to learn and practice shooting on manual; 2) Not having the time to set up on manual.

Either way, there is something you can do to save time and simplify your life. It’s called exposure compensation. To find it on your camera, you’re going to have to refer to your camera’s user manual. Each manufacturer places it differently on their cameras. Finding it and learning how to use it with some practice will be a worthy investment for any photographer!
Defining Exposure Compensation:
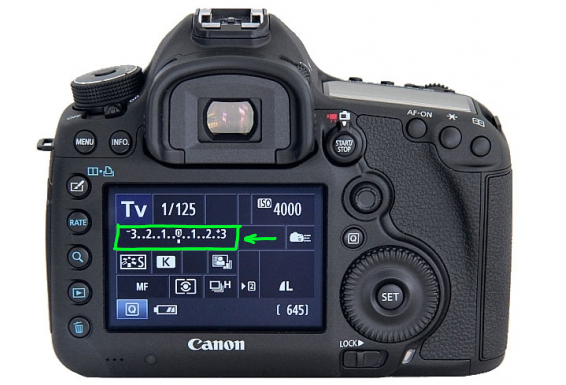
Most DSLR’s today have some level of exposure compensation capability. The more professional the camera, then the greater the ability. Exposure compensation allows you to change a picture’s exposure from the auto-selected value by the camera. It allows you to make any photograph brighter or darker.In other words, it is a way to adjust exposure despite the meter’s default reading. Depending on your camera, you can make adjustments incrementally whether it’s a, ⅓ stop or one full stop at a time.
How Does It Work:
There are three shooting modes: scene, auto, P/S/A/M modes. In auto and scene, your camera will control both aperture and shutter speed. P/S/A/M modes allow you to control either shutter or aperture. Which mode you are shooting in dictates how you will use exposure compensation.
Whichever mode you are shooting in, you can simply add or reduce the stops for exposure compensation. If the photo is too dark and you are shooting in aperture, you can add a one stop using the exposure compensation to lighten the picture. As an example, if you are shooting in shutter priority mode, your will camera open the aperture to allow for more light giving you a brighter picture. So, if your image is too bright, you can lower the exposure compensation number. You can almost look at it as a manual override of your camera’s meter.
In program mode, how you adjust relies heavily on the camera’s manufacturer. Typically, the cameras will compensate using a combination of shutter and aperture. If you are shooting in manual mode, the correct exposure is indicated by your camera’s meter, and that is the compensated exposure.

Putting It to Use:
Most photographers end up using exposure compensation because camera meters aren’t perfect. Meters are close to perfect, but they don’t always make up for what the human eye can see. You can correct your camera by compensating particularly under tricky conditions such as shooting on a very bright day or shooting a white snow scene. The camera’s meter tries to pull the exposure one way, but you can compensate to get the correct brightness to represent the snow's color as white not gray accurately.
Another opportunity to employ exposure compensation is shooting a small object, particularly one in motion, against a bright background. If you are shooting a small moving object like a bird or even a young child in an open field, the camera’s meter will pick up the background, not the object. This can cause issues with the brightness. Using exposure compensation allows you to adjust the stop to capture the small object rather than the background better. How much you use is a personal decision. It’s up to you to know and to decide how much exposure (how bright or dark) you want any given picture. You likely will need to play around with exposure compensation to get comfortable employing it quickly and easily.
While many photographers will rely on their preview screen to decide whether or not to compensate manually by adjusting the stop, it’s a better practice to look at your camera’s histogram instead. It’s the most accurate way of know whether you need or want to compensate. Knowing how to use and read a histogram is a smart decision as any professional photographer very well knows. The more you use it, the easier it will become.
The beauty of digital photography is the ability to see the results of your shot instantly. Try using exposure compensation whenever you take a picture where you’re not happy with the light. The more you play with it, the better you’ll get at using it as a step toward shooting fully on manual!
We would absolutely love for you to follow us on FACEBOOK and be a part of our community. Don't forget to Share your photos with us using hashtag #BeArtPresets